Just so You Know??:
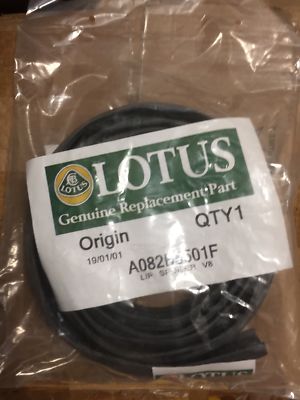
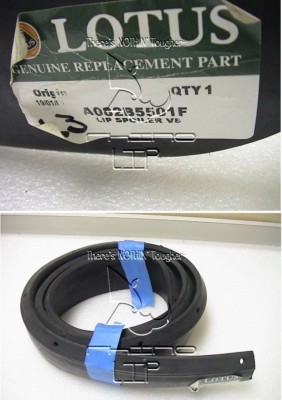
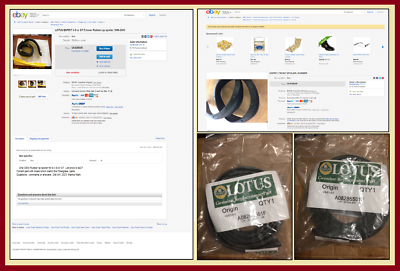
RhinoLip® Is Modelled After The NLA Or No Longer Available LOTuS Rubber Chin-Lip.
The LOTuS Rubber Chin-Lip Could Be Bought NEW OEM For $417.00USD/Each.
Want A NOS or New Old Stock LOTuS Rubber Chin-Lip?, You Can some-times Find Them on eBay For About $200.00USD/Each.
LOTuS Motor~Cars LTD.
(You Know, Those Waaaaaay Smarter Than Most High-End Cars & Performance Guys??.)
Used Push-In Type "Christmas-Tree" Rivets To Mount The LOTuS Rubber Lip.
Rhinolip Thought Lotus Engineers Know Some Things That Most People & Even Those EZ-Chair "Smart" Just Tape-It-On 10-Minute Install Quack-Engineers Think They Know.
(You Know, Those 10-Minute 3-Step just Peel & Tape-In-On Geniuses?)
Rhinolip Only Added A Slight Improvement To The Lotus Install Hardware Scheme By Using Alternating Self-Tapping Screws + Nylon Washers In-Between The Christmas-Tree Rivets.
So, If You're Alright With A "Hardware Only Mounted Kit"?
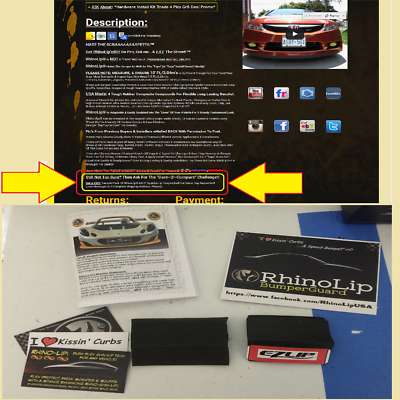
RhinoLip Has This Promo: Including A Std. Basic Hardware Install Kit For The Trade On RhinoLip's Request To Snap-&-Share eMail Us Back A Few Pic's Of Your Car "RhinoLip'ed".
RhinoLip® Previously Offered To Refund Shipping Fees For The Courtesy Of Emailing Back Those Pic's But The Std. Hardware Install Kit Is The Much Better Deal.
It Gets You Everything You Need In One Place For A Standard Installation (A $5.00USD Value Compared To The Shipping Fee Refund).
A Typical Installation Takes About An HOURS Time.
Yeah, it's NOT "E-Z", It's NOT 10 Minute 3-Step Easy-Peezy Crap Install.
We "Get That". Hope You'll Appreciate Doing It Right The 1st. Time.
Hardware Installed? For a Tough To Install Tough Enough To STAY Installed "Install".
So? Lets Get Started & Get Your Car "RhinoLip'ed"!!.
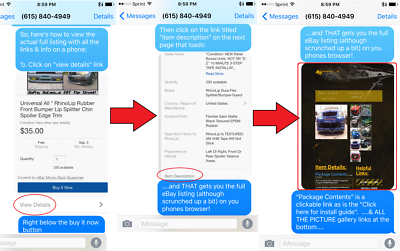
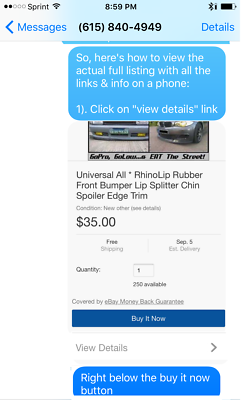
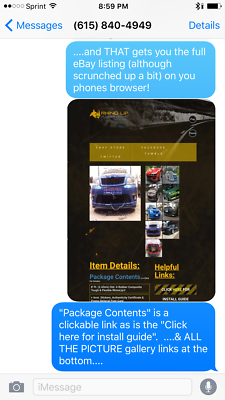
(Sorry, These PICS Are as BIG as eBay allows....we actually have FULL SIZE PICS But when we tried to up-load them all??
eBay SCOWLED an error message at us stating they only allowed 10 total pic's in these guide-outlines so, hate-&-blame the eBay machine & don't hate & blame on us, mmmmkay??).
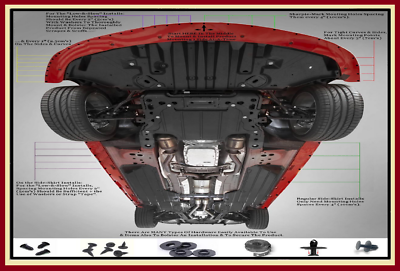
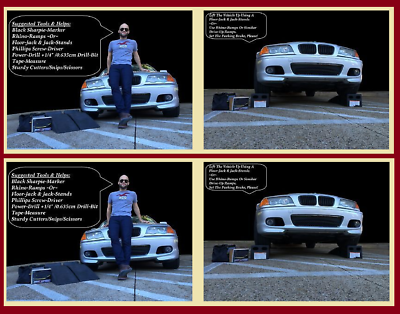
Get All The Essential "Stuff" To Safely, SAFELY Do A RhinoLip® Installation.
(Rhino-Ramps Naturally Are RhinoLip's Proposed Choice To "Lift" The Car Up Safely).
YES! Get it Safely Jacked Up & Accessible!
Now? Go Get Your "Not Your Mothers Ice-Tea" Favourite Beverage,
& Lets Get Ready To:
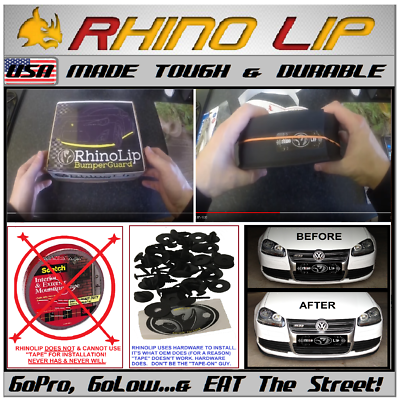
RhinoLip®!:
GoPro, GoLow,
....& EAT The Street!!.
You'll need the following:
1 - RhinoLip® Kit
1 - FRESH Sharpie,
1 - Screw-Driver
Maybe Some 1/2" Wide Blue-Tape
(To Outline Where to Position The RhinoLip For The Best Results!)
1 - Measuring Tape (Cloth, Ruler, Or Metal Retracting Type),
1 - Sheet-Metal Cutters Or Strong Scissors,
1 - Cordless Drill & 1/4" (6mm) or slightly smaller Drill bit.
1 - Hammer (It's Been Found Helpful "Seating" The Christmas-Tree Rivets Snugly)
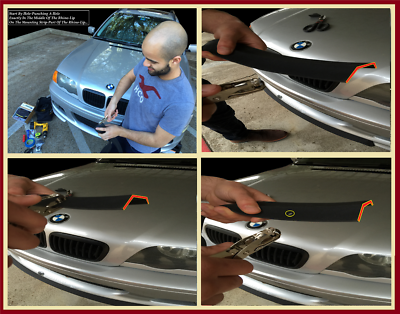
Mark Your Mounting Points With A Sharpie!.
RhinoLip's Recommendation?: Mounting Points every 3.5 - 4" Spacing on The Straights.
***Note, Please!: If Your Car Is "Stanced", "Slammed", "Lowered", "Slow-&-Go", Or "Bagged"?:
You'll Need To DOUBLE The Mounting Points & Space Them Every 2" Using A Bolstering Method (Like Diebond strips, Metal Duct-Hanging Strap [with the holes in it], On The Mounting Points.
Why?, Well, On A RhinoLip?, The Weakest Link IS The "Mounting Points".
With Mounting Points Measured & Marked?,
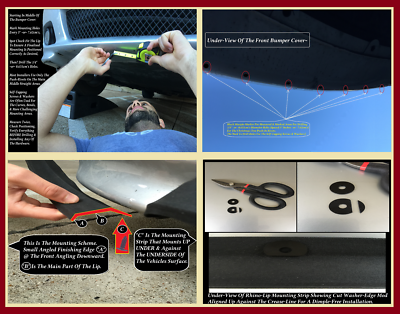
Please NOTE How The RhinoLip MOUNTS Up Into Place.
Don't Worry!!, The RhinoLip Folds DOWN To A 45° Angle Once Fully "Installed".
A RhinoLip'er Suggested Hack & Mod: Creating a "Straight-Edge" on the Nylon-Washer.
This Straight-Edge Aligns With The 1st. Crease On The Mounting Strip, (The VIEW Is From Up Underneath)
This Keeps The Front Part Of The RhinoLip® That Is "Seen" From being "DIMPLED".
Ok, ONE MORE TIME: PLEASE REMEMBER How The RhinoLip® Mounts Up & To The Car.
RhinoLip's Recommendation? Alternate The Self-Tapping Screws & Nylon Washers In Combination With The Christmas-Tree Rivets.
RhinoLip'ers Recommendations?? Use ONLY The Christmas-Tree Rivets On Straight Middle Areas.
Use the Self-Tapping Screws On The Curves/Radius Areas On Either Ends.
It's Up To YOU: Just Pre-Think Everything: "Plan Your Work & Then Work Your Plan".
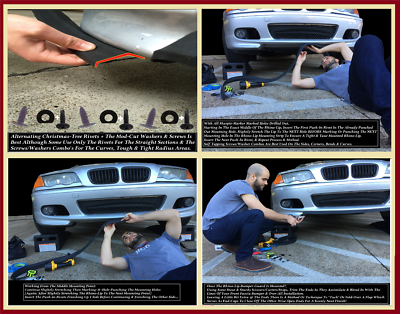
STARTING POINT: Middle Of The Bumper/Fascia Area & Middle Of The RhinoLip.
Work To Install ONE Side At A Time. Taking your Time & Doing It Carefully.
NOTICE: How To Start "Punching Holes". What You See Closest To The Installer?
Is the RhinoLip® Mounting Strip Area.
It's EASIER to Punch Holes As You Install Because??:
YOU'LL ABSOLUTELY NEED TO SLIGHTLY PULL & STRETCH THE RHINOLIP® OVER
TO THE NEXT MOUNTING POINT TO ENSURE A TIGHT & TAUT INSTALLATION.
So Punch The Holes As You Go Along, remembering to slightly STRETCH The RhinoLip To The Next Mounting Point. Using The Hole-Punch To Punch The Mounting Holes Exactly Where YOU Deem Them Needed & Necessary. Hole-Punch "Punched Hole" Circled In Yellow.
Like Previously Stated:
STARTING POINT: Middle Of The Bumper/Fascia Area & Middle Of The RhinoLip®.
Work To Install ONE Side At A Time. Taking your Time & Doing It Carefully.
***Use A Hammer To FIRMLY Seat The Christmas-Tree Rivets IN As SNUG As Possible***
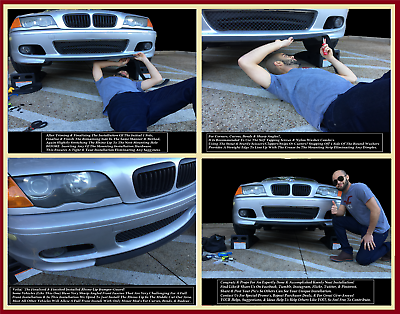
(On This Car & for Demonstration Purposes? We Opted To Do ONLY The Middle Section)
Cut-Off The RhinoLip® Ends (Straight Or Angled) For A Keenly-Clean Finish.
Now Start On The Other Side As Carefully & Methodically As The Other Side Was Done.
Finishing Up With The Final Self-Tapping Screw or Push-Rivet.
Cut-Off The RhinoLip® Ends (Straight Or Angled) For A Keenly-Clean Finish.
Voila! Now The RhinoLip's Installed?
You Can Fully Finish Your "Not Your Mothers Ice-Tea" Favourite Beverage.
You Look Cool, You're Car Looks Cool....& Congratz & Kudo's On A Job Well Done!.
RhinoLip®:
GoPro, GoLow,
...& EAT The Street!™
"There's Nothing Tougher than a RhinoLip!™"
Hope This Helps?
Please Do Check Our YouTube Channel For More Info, Tips, User-Tricks, Unboxing/Review & Explainer Video's.
Thank you.